Cross
stitch is one of the most popular of crafts and is extremely simple to
learn. If you are new to this form of embroidery, this will give you all
the information you need.
In
cross stitch, a pattern is transferred from a charted design to a piece of
unmarked fabric. The chart is a grid of squares with symbols forming the
design. A key tells you which colour of embroidery thread (silk) relates
to which symbol in the chart. Working the design is simply a matter of
stitching a series of crosses in the appropriate colour according to the
arrangement on the chart.
Each
square on the chart represents a full cross stitch and each symbol
represents a colour as specified in the key. A heavy line indicates where
to backstitch and the key will tel you which colour to use for the section
of backstitching. Arrows indicate the center of the design on the chart.
Thread
the needle with the appropriate number of strands and bring it through the
fabric, leaving 2 cm of waste thread at the back. Hold this trail
carefully and make sure that your first four or five stitches secure it.
Then trim any excess.
Stitch
a series of diagonal bars running from left to right. Then, at the end of
the row, return by stitching the top bars from right to left. Drop your
needle to the bottom of the next row and repeat the process. Stitches in a
sequence interlock, sharing holes with the neighboring stitch
Many
charts also include backstitching to define and provide detail. It is
indicated by a solid line or in some cases a broken line, on the chart.
Backstitch is always worked after cross stitching is complete and is
worked in a continuous line.
HAPPY
STITCHING :)
For
more help, please go to my Stitching Glossary.


How
To Make A French Knot

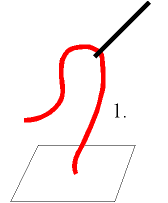
 1.
Push the threaded needle through the fabric to the front and pull the thread until it is all through.
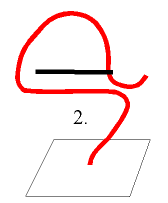
 2.
Hold the needle and the thread parallel to each other.
The needle point
should point towards the free end of the thread (the end that goes into
the eye of the needle).
Note: If the needle point is pointing towards where the
thread comes up through the fabric, there will be no knot.
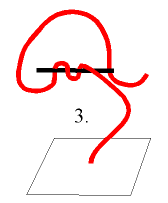
 3. Wrap the
thread one, two, or three times around the needle, laying each loop closer
to the needle point.
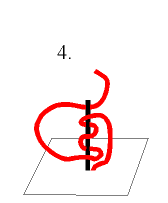
 4. Pierce the
fabric with the needle, right close to where the thread comes up from the
back. Leave the needle half-way through.
Note: You can use the same hole only if the knot will be too big to
go through the hole. If it will be smaller, you must pierce the fabric at
least one thread away on the way down.

